

primitive bows and arrows were made using raw materials such as the wood from various trees including ash, hickory, cedar, oak, walnut, and birches. In some instances, Native Americans used the antlers and other bones from different animals when available. These included elk and caribou antlers, bison ribs and horns, and mountain sheep horns.
According to the University of Iowa, typical Native American bows ranged from the self bow, a bow featuring a single stave of wood, to the backed bow which was made of wood and was reinforced with sinew, and finally, the composite bow, which featured some combination of a horn or antler and a sinew backing. The sinew was usually from the back of an animal or a leg tendon but was sometimes made of rawhide or intestines. Some tribes fabricated cords from the necks of snapping turtles while others used materials like plant fibers to use as cords.
Luckily, we no longer need most of these gruesome materials to create our homemade bow and arrow sets. We spoke to Michael Spink, who started making his own bows after a compound bow failed him on turkey hunt several years back, who showed us the best way to DIY a bow right at home.
Whether you’re an archer or a hunter who prefers using a custom, hand-forged weapon, this tutorial will help you masterfully craft your very own bow and arrow set. Here, Spink walks us through how to make a 68-inch Native American longbow.
Making the Bow
Step 1. Choose wood wisely. The basis for any good bow is choosing the right wood. You’ll want to use hard woods such as hickory, oak, and maple. Avoid weaker woods such as pine since you’d need to use thicker pieces—adding weight and extra bulk—to avoid breakage. Look for a diameter of at least eight inches, which will require less carving. Because bows are made from vertical slices of the tree, on a smaller tree the arc of the outside edge—the part that becomes the back of your bow—will be more pronounced, requiring more shaving to flatten it out.
Step 2. Cut and split the tree. An 8-inch tree provides six or seven bow staves. Leave enough room on the end of each stave to cut off roughly 6 inches, where the wood might have cracks. For example, a 68-inch bow needs at least a 6-foot piece of wood. Keep the stave roughly 1 inch wide from tip to tip and 1 inch thick. Leave the bark on to reduce cracking as the wood dries.
Step 3: Let the wood dry. This typically takes at least three or four weeks but can be up to a year. If you want to be sure, buy a moisture meter and wait for a readout of 11 or 12 percent. The most flexible wood will warp into a bend called a reflex.
Step 4: Debark your bow with a drawknife, as shown below, and mark the shape of the bow’s broadside. For a Native American longbow, the 5 inches in the center should be narrower than the limbs—1¼ inches across, widening out to about 1½ inches.

About 19 inches from the midpoint, taper down the limb to end with ½-inch-wide tips, as seen here:

Step 5: With a drawknife or band saw, refine the shape. Use a tactical knife to finish things off.
Step 6: Lay the bow flat and taper the sides of the limbs with a drawknife. The middle 5 inches, which will be your grip, should be ¾ inch thick, tapering off to 1/2 inch when you reach the ends.
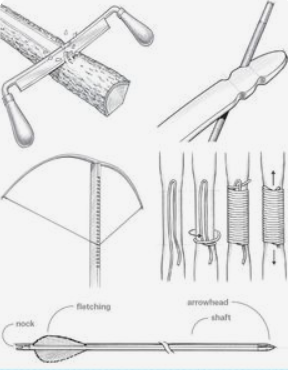
Step 7: Use a chainsaw file, as seen below, to make string grooves at a 45-degree angle on the outside of both tips, about 1/2 inch from each end. On the bottom limb, make an extra set of grooves for the bow stringer, a separate string used to bend the bow for stringing.

Step 8: Sand down the edges and tips and smooth the front and back surfaces. Then, with one tip of the bow against the ground, apply pressure to the top to create a slight bend—this is called floor tillering—inspecting the bow for any cracks or imperfections. If you see anything other than small cracks on the front, you’ll have to start over with a new piece of wood.
Step 9: Create a tiller tree (below) to test your bow’s flexibility. Vertically secure a 2 x 4 to the wall. Starting 5 inches from the top, make a horizontal notch with a Skilsaw every inch until you reach 30 inches. String the bow loosely with parachute cord, center it on the top of the tree, and slowly move the string down the notches until it reaches the 28-inch mark, a typical full draw. At each step look for unevenness in the bend of the limbs. If they don’t bend equally, even them up by shaving from the side that doesn’t bend as much.

Step 10: Shorten the parachute cord to make a small bend in the bow (5 inches between the bow center and the string). Repeatedly draw the bow in a mirror to see which side remains slightly stiffer. The stiffer limb will be your lower limb. Once you identify it, use a sander to create a shallow indentation above the handle to the right or left, depending on which hand you use to shoot, for the arrow.
Step 11: Sand and finish the bow. Hunters may want to use a dark stain because it’s harder for animals to see.
Step 12: Once the bow has been stained, dried, and sealed, wrap the 5 inches of handle with hemp cord using a whipping technique (below). Apply a light coat of glue, such as Titebond III, and let dry.

Step 13: Create your final bowstring using a new length of B-50 bowstring material. A properly strung longbow should have enough bend to leave roughly 7 inches between the bow and the string.
Making the Arrows
If you really want to MacGyver your own shafts from scratch, you can, we suggest skipping this step. It’s too complicated, and even the smallest imprecision can throw off your shot. This means making your own arrows is really more of a process of assembly than of construction.
Step 1: Shaft diameter is determined by the weight of your bow and other factors. Consult a spine chart to find the appropriate diameter, then order a set of matched wooden shafts. Paul Jalon of Elite Arrows in Bloomfield Hills, Michigan, has crafted his own arrows—been used to win 24 International Bowhunting Organization World Championships—since 1952. Jalon prefers to use Port Orford cedar, but Sitka spruce and Douglas fir work too.
You’ll also need nocks, a fletching jig, a taper tool, and archery feathers. Turkey feathers are the industry standard because of their thickness and consistency.

Step 2: Wipe the shafts down with acetone to remove any sap. Then, lightly sand them.
Step 3: Use the taper tool, which resembles an oversized pencil sharpener, to taper one end of the shaft to fit your nock. Taper tools make both 5- and 11-degree tapers. Use the 11-degree taper for the nock.
Step 4: Roll the shaft in an arrow spinner to find any bends. (You can build a simple version yourself using four casters.) Treat any curves by holding the arrow firmly on a flat surface and running the body of a screwdriver over it from end to end. This should force the wood to lie flat. Repeat until the shaft looks straight in the spinner. This is the most important step, so be sure to get it right before moving on.

Step 5: Seal your shafts by brushing them with acrylic floor finish. Let them dry for three to four hours, then sand lightly. Repeat for three total coats.
Step 6: Use clear fletching cement or instant glue to attach a nock to the tapered end of the shaft. Then use a fletching jig to attach three or four precut feathers, and let dry.
Step 7: Place the uncut arrow on your bow and draw it back. Have someone else mark the arrow an inch in front of the bow handle. Cut the arrow at the mark, taper the cut end, and apply your point or broadhead using hot glue or epoxy. Let dry.
Now your bow and arrows are 100 percent ready.


